

How To Auto Fill A Label Template
Template Tuesday Presents...how to create your own label templates in Word, using Word'southward Create Labels tool.
Delight notation: this method is NOT suitable if your A4 labels have gaps between the rows and/or columns that measure out less than 4.2mm.
(Visiting from America? Cheque out our guide to creating label templates for American label sizes.)
CREATE LABELS – Step 1: Showtime The Create Labels tool
Open a blank certificate in Word, click on the "Mailings" tab at the top of the folio, and click on "Labels". This will open a box titled "Envelopes and Labels". Click on the "Options" button to create a new label template. This opens another box titled "Label Options". Click on "New Label", which opens a farther box titled "Label Details".
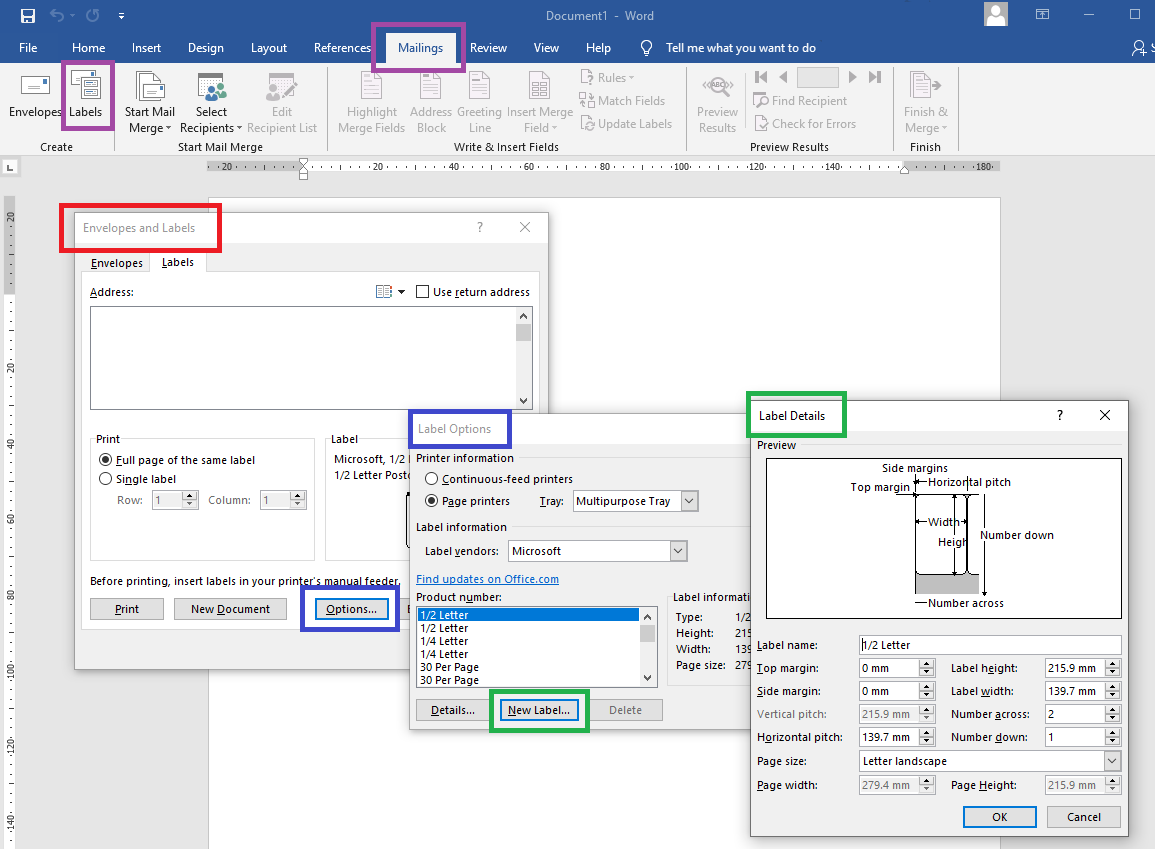
CREATE LABELS – Stride 2: Enter The Measurements Of Your A4 Labels
Make full in each of the required fields. Y'all will demand to know the following data about your A4 labels:
- Top & Side Margins
- Characterization Width & Label Elevation
- No. of Blank Labels Across & No. of Blank Labels Down
- Vertical Pitch & Horizontal Pitch
This seems simple enough, right? Well, yes and no. Word does take a tendency to exist extremely picky near how you utilize its congenital in tools then we recommend following these Height TIPS to make certain your measurements measure up to Word'due south expectations.
Create Labels – Order Your Measurements Carefully
While you lot'd assume you could merely start filling in the measurements in the order in which they are listed, Word will sometimes start to automatically correct your measurements before you've finished adjusting all of the fields – and other times it volition reject your measurements when yous try to create your label template.
We recommend using this club:
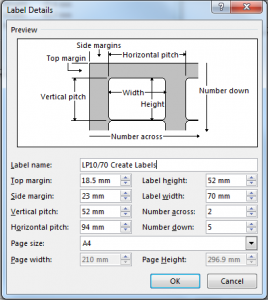
- Page Size: set the page to A4 and DOUBLE Cheque the measurements are 210mm wide by 297mm loftier. To create a landscape template, select A4 landscape, which is the next choice down.
- No. of Labels: enter the number of labels across and the number of labels downward.
- Label Width & Characterization Height: enter the measurements of each blank label. If y'all are creating a characterization template for round labels, enter the diameter of each circular label for both the width and height.
- Vertical Pitch & Horizontal Pitch: the vertical pitch indicates the acme of each label plus whatever gap between each row of labels and the horizontal pitch indicates the width of each label plus any gap between each column of labels. If at that place are no gaps, the vertical pitch will be the aforementioned as the height and the horizontal pitch volition be the aforementioned as the width.
- Height Margin & Side Margin: enter the top and left margins for your A4 labels. If y'all discover that Word disagrees with your measurements, endeavour reducing the margins to 0mm before you enter the residue of your measurements.
Create Labels – Format Your Measurements Carefully
Yous also need to be careful as to how you enter the measurements. All of your measurements (except for number beyond and number down) must be expressed every bit a value, followed by a single blank space, and and so the unit symbol for the measurement being used. In other words, if the label width is 70mm you lot MUST enter this as 70 mm.
If Give-and-take is fix upward to utilise centimetres as the default measurement y'all tin can EITHER split up the measurements past 10 to catechumen millimetres into centimetres OR you lot can change the default measurement to millimetres.
- Discussion: click on File > Options > Avant-garde – scroll down to the Brandish section and cull your preferred unit of measurement from the "Evidence Measurements in units of" drop down listing.
- Word For Mac: click on "Give-and-take" in the menu bar at the elevation of your screen, and select "Preferences"; in the Give-and-take Preferences box, select "General" from the Authoring & Proofing Tools Section, and and then select your preferred unit of measurement from the "Measurement units" drop downward list.
At Characterization Planet, nosotros provide detailed measurements for all of our characterization sizes on our Template Information Pages. To find the label template information for a detail label size y'all can either go through our Label Templates home page (select your label shape and and so your characterization size) or visit the product page of your characterization size and click on the royal "Label Templates and Press Information" link.
CREATE LABELS – Step iii: Open Your New Label Template
Give your characterization template a name then click "OK". You volition be returned to the "Characterization Options" box where you should click "OK". You lot will be returned to the "Envelopes and Labels" box where you lot should click "New Document".
This opens a new document containing your label template. In Discussion, label templates are fabricated using a table where the cells of the tabular array represent your blank labels (and whatsoever gaps between them). Word label templates, therefore, cannot bear witness whatever shaping on rectangular labels and square labels (such equally rounded corners) and cannot show the outline of circular labels and oval labels. Instead, each bare label will be represented by a rectangle or square into which each label volition fit with its outermost points touching the iv sides of the tabular array cell.
We recommend saving a copy of your label template now before you lot start adding your label design.
You may also want to make a few formatting changes. For case, we recommend centralising label templates and the contents of label templates to ensure that your blueprint fits neatly inside each blank label.
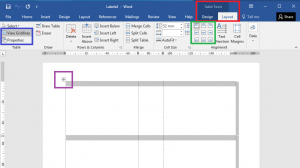
To centralise the template itself, select the whole table by moving your cursor to the pinnacle left corner and left clicking one time on the icon of a 4 headed arrow. This brings up two Table Tools tabs at the peak of the page; click on "Layout" and then click on "Properties" – on the Table tab of the Properties box, gear up the Alignment option to "Centre".
You can also use the Table Tools Layout tab to turn on Table Gridlines; if you cannot come across the outline of your template, you have Table Gridlines turned off – there is a View Gridlines button on the far left of the Table Tools Layout tab that you tin can use to turn them back on.
To centralise the content of your template (or choose any alignment you lot adopt), select the whole table equally described to a higher place and select ane of the ix icons contained in the Alignment section towards the right hand side of the Table Tools Layout tab.
Create Labels – Benefits & Disadvantages
There are ii key benefits to using Word's Create Labels tool. Firstly, if y'all don't have much experience working with Give-and-take and tables, this tool automatically does about of the work for you. Secondly, label templates created using the Create Labels tool are also completely compatible with Word's Mail Merge tool (compared to standalone templates where y'all volition need to complete some steps of the Mail Merge manually).
The main drawback of using Word's Create Labels tool is that the tool automatically does most of the work for yous – and not necessarily in a mode that produces the near accurate characterization templates. Word will use a set of default formats and options that aren't always the best for creating and designing characterization templates. For example, equally nosotros mentioned at the offset of this blog post, the Create Labels tool cannot create gaps of less than four.2mm. If, however, you create a label template manually information technology is possible to create gaps of as little every bit 0.4mm.
To become the greatest degree of control over your label templates, we advise using Word's Tabular array Tools to create a label template manually.
Next Calendar week On Template Tuesday – How To? – How To Make Characterization Templates Using Word's Table Tools

How To Auto Fill A Label Template,
Source: https://www.labelplanet.co.uk/how-to/template-how-tos/label-templates-word-create-labels/
Posted by: garnergrele1962.blogspot.com
0 Response to "How To Auto Fill A Label Template"
Post a Comment